Friday, July 30, 2010

The Greeting Farm: Hippie Anya

Sorry for the late posting, but I actually colored her at work and then put her together at home. (My boss is on vacation, so other than manning the phones and getting ahead on a few things, it's pretty quiet at work.) I'm still working on the skin tones for people stamps, and may have to order a few more Copic markers. However, tomorrow I'm going to the CHA Supershow, so I'm am trying to behave. (It didn't work so well earlier during the week as Michaels had a screaming Cuttlebug/Cricut sale which I wasn't expecting when I went in for glue dots and an album, but I didn't buy anything today.) Anyway, here she is:

Photobucket

Materials:

- A2 white card base, 4 x 5.25" pattern paper by We R Memory Keepers ("Write Out Collection")

- Adhesives: Glue Arts Glue Glider Pro, glue dots

- Stamps:Greeting Farm Hippie Anya using Ranger Archival ink (embossed with clear embossing powder), colored with Copics, and Hero Arts "Everyday Sayings" using Colorbox chalk ink

- Punch(es): small circle punch, about 1.5"

- Embellishments: buttons from Michaels dollar bin


Photobucket

Thursday, July 29, 2010

Here Comes Trouble - Baby Card

The B is for Boy and Sugar and Spice Cricut cartridges certainly have been put to use. This baby card was made using both and would be perfect for a boy or a girl with just a little hair and a color scheme change. I finally got my best friend's baby gift in the mail today, so I hope she likes it.

Photobucket

Materials:

- A2 blue card base, 4 x 5.25 white cardstock

- Cartridge(s): B is for Boy (greeting cut at 1.75", baby cut at 1.5"), Sugar and Spice (stork cut at about 4")

- Adhesives: Glue Arts Glue Glider Pro, Zig 2-way glue pen, glue dots, Mod-Podge

- Cuttlebug embossing folder: Swiss Dots

- Blue ribbon from Michaels


Photobucket

Tuesday, July 27, 2010

Wedding Card

Here's the wedding card I made for Joe and Tam's wedding on Sunday. Unfortunately, I ran out of time and did not put the wedding cake on the inside that I had intended. I am hoping to make a small scrapbook for them later this summer so there will be time for more wedding diecuts. Tam wore her hair up, so in the album I will adjust that. Joe work a tan suit, so I'm not sure how I will adjust for that. I love a coat and tails!

Photobucket


Materials:

- 5 x 7 white card base, 4.75 x 6.75 silver cardstock

- Cartridge(s): Paperdoll Dress Up (people and outfits cut at 4"), Gypsy Wandering (greeting cut at 1.5")

- Adhesives: Glue Arts Glue Glider Pro, Zig 2-way glue pen, foam tape, glue dots

- Stamps: Peachy Keen Stamps - "Critter Faces" and Colorbox chalk ink

- Cuttlebug embossing folder: D'vine Swirls

- Punch(es): small flower punch

- Organdy ribbon from Michaels, pearls


Photobucket

Monday, July 26, 2010

Baby Boy Mini Album

While it is a week overdue, here's the full completed Baby Boy Mini Album for my best friend's new baby. While I showed you the details last week, here's page by page. There are at least 20 place for photos (and/or journaling) and more than 30 shapes or words cut with my Cricut. Hope she likes it.

Baby Boy Mini Album Cover
Cover

Baby Boy Mini Album Inside Cover - Page 1
Inside cover and page 1

Photobucket
Pages 2-3

Photobucket
Pages 4-5

Baby Boy Mini Album Pages 6-7
Pages 6-7

Photobucket
Pages 8-9

Baby Boy Mini Album Page 10 - Back Cover
Page 10 and inside back cover

Baby Boy Mini Album Back Cover
Back Cover

Sunday, July 25, 2010

Baby Boy Mini Album Page 1

Here's page 1 that I did last because I was struggling with the font size and welding feature (Gypsy), but I think I finally got it right. The toys are from Sugar and Spice, while the onesie is from B is for Boy. In tomorrow's post, I'll do a recap of the entire mini-album so you can see how it's laid out.

Photobucket

Materials:

- We R Memory Keepers "Write Out Collection" paper cut at 8.5 x 7.25", strips of blue and white cardstock cut about 1" and 1.25" x 1.5" to fit.

- Cartridge(s): B is for Boy (onesie cut at 6.5"), Sugar and Spice (rattle cut at 1.75", bottle cut at 2"), Alphalicious (words cut at around 1", scaled to fit using Gypsy)

- Adhesives: Glue Arts Glue Glider Pro, Zig 2-way glue pen, Mod-Podge, foam tape, Xyron

-Embellishments: Making Memories "School days" packaging tape

Saturday, July 24, 2010

Hip, Hip, Hooray Hippo

I made this card as a congratulations/goodbye card for someone who is retiring briefly to begin another job. This is my first hippo card even though it's one of the cutest and most popular critters on the Create a Critter cart.

Photobucket

Materials:

- A2 white card base, DCWV "Summer Dreams" cut at 4 x 5.25"

- Cartridge(s): Create a Critter (hippo cut at 3.37", greeting cut at 1.07" using my Gypsy)

- Adhesives: Glue Arts Glue Glider Pro, Zig 2-way glue pen, Mod-Podge, foam tape

-Embellishments: ribbon, flower, brad

Friday, July 23, 2010

Baby Boy Mini Album Pages 8-10

Sorry for the late post. The never-ending saga of my building's internet connection fouled things up last night. As promised, I came home from work and finished several pages of the Baby Boy Mini Album, three to be precise! Then I toddled over to my computer to upload the pictures...no internet connection at all! Well, I complained all day and finally it looks like I have access. Thus, I'm going to quickly load the three pages and schedule a post for tomorrow.

These three pages have a space theme. I kept the embellishments simple because the paper is so cute. B is for B was used for all images.

Photobucket

Photobucket

Materials:

- DCWV "All About Boys" paper collection cut at 8.5 x 7.25", two mats cut at 4.5 x 6.5 before punching, two white pieces of cardstock cut at 7.75 x 5", 4 mats (cardstock and paper) cut at 4.5 x 4.75", a strip of pattern paper cut at 3 x 7.25"

- Cartridge(s): B is for Boy (astronaut cut at 4", gun cut at 2.5", spaceship cut at 1.75")

- Adhesives: Glue Arts Glue Glider Pro, Zig 2-way glue pen, Mod-Podge, foam tape, glue dots

-Embellishments: buttons, ATD stickers by My Momenta "Boys Will Be Boys," stickles glitter glue


Photobucket

Photobucket

Photobucket

Photobucket

Photobucket

Photobucket

Thursday, July 22, 2010

The glue wasn't dry yet

So check back for the next pages in the Baby Boy Mini Album this afternoon/evening. For now, check out the latest new cartridge that's going on my wishlist here. It's called Simply Charmed and will be available in August. Can't wait!

Photobucket

Tuesday, July 20, 2010

Baby Boy Mini Album Pages 6-7

Happy Wednesday! This week and this summer seems to be flying by. Yesterday, I hinted that I would be moving away from primary colors for the remaining pages of the book, but that just didn't happen. Originally, I made the robot larger and in different colors, but he just didn't work on the page Thus, I returned to the basic red, yellow, blue, black combination. I really love this sprockets paper from the DCWV "All About Boys" paper stack, as well as the robots paper on the next page (so much so that I think I am leaving it largely empty to show off the paper). The top photo mat lifts up for hidden journaling or photo space.

Photobucket

Photobucket

Materials:

- DCWV "All About Boys" paper collection cut at 8.5 x 7.25", black cardstock cut into two 3.5 x 3.25" mats, green textured cardstock cut into two 3.25 x 3" mats, beige cardstock cut 3.25 x 7".

- Cartridge(s): B is for Boy (robot cut at 4")

- Adhesives: Glue Arts Glue Glider Pro, Zig 2-way glue pen, Mod-Podge, foam tape

-Embellishments: gold brads (3/8"), ATD stickers by My Momenta "Boys Will Be Boys."


Photobucket

Photobucket

Photobucket

Baby Boy Mini Album Page 5

Here's page 5 of the Baby Boy Mini Album that I'm making and the last page for awhile using mostly primary colors. When I sketched out this book, I had originally intended this page to have an elephant on it and possibly a circus theme. However, I decided that another cute bear-like creature fit better. Plus, he took up less space than Mr. Elephant would have. The flip photo mats and safety pins add some dimension. I debated adding a title or not and decided that leaving lots of space to write seemed like a better idea.

Photobucket

Photobucket

Photobucket

Materials:

- We R Memory Keepers "Write Out Collection" paper cut at 8.5 x 7.25" and cut into two 3 5/8" squares and 4.5 x 3 5/8", beige cardstock cut at 8 x 3 7/8", and black cardstock cut to 2 x 7.25" (before punching)

- Cartridge(s): Create a Critter (koala cut at 1.74" using Gypsy), B is for Boy (ball cut at 1.74" using Gypsy), Sugar and Spice (wagon cut at 2" using my gypsy)

- Adhesives: Glue Arts Glue Glider Pro, Zig 2-way glue pen, Mod-Podge, glue dots, foam tape

-Punch(es): Crop-a-dile, MS Scallop Dot Edge

- Safety pins (1.25") from Jo-Ann's

Monday, July 19, 2010

Baby Boy Mini Album Page 4

Here's page 4 of the Baby Boy Mini Album that I'm making. This is my favorite bear from all my cartridges, so I'm happy to share him with the baby. It's dusk now, so the picture is a little dim, however I kept the flash pointed away to avoid a glare from my Mod-Podging.

Photobucket

Materials:

- We R Memory Keepers "Write Out Collection" paper cut at 8.5 x 7.25" and 3.25 x 4.75", red cardstock cut at 3.5 x 5", black cardstock cut to 2 x 7.25" (before punching)

- Cartridge(s): Create a Critter (bear cut at 3.75", balloons stretched to about 1.25 x 1.5"), Cricut Lite Carousel (flags cut at 1.5")

- Adhesives: Glue Arts Glue Glider Pro, Zig 2-way glue pen, Mod-Podge, glue dots, pop dots from Stampin Up.

-Punch(es): Crop-a-dile, MS Scallop Dot Edge, Corner Chomper

Sunday, July 18, 2010

Baby Boy Mini Album Pages 2-3

Hello there. Today's post is the second and third pages of the mini album I'm making for my best friend's new baby boy. I skipped the inside cover and the first page as I'm still working on those. These two pages whipped up fairly quickly using Create a Critter and B is for Boy once I decided how I wanted to arrange the train. I love the bright colors and hope that I can continue them throughout the album even though I have a few more themes planned within this album. Comment and let me know what you think.

Photobucket

Photobucket

Photobucket

Materials:

- DCWV All About Boys paper stack cut to 8.5 x 7.25", blue cardstock cut to 2 x 7.25" (before punching)

- Cartridge(s): Create a Critter (train cut at 3", giraffe cut at 3", frog at 1.75", seal at 2", special delivery at 1.75"), B is for Boy (lion cut at 2.75")

- Adhesives: Glue Arts Glue Glider Pro, Xyron, Zig 2-way glue pen, Mod-Podge, glue dots

-Stamps: Peachy Keen Critter Faces stamps, Colorbox Chalk ink

-Punch(es): Crop-a-dile, MS Arch Lattice, Fiskars slots


Photobucket

Saturday, July 17, 2010

Baby Boy Mini Cover

Hello. I'm making a mini album to give to my best friend who just had a baby boy. I know she checks out my recipes blog, but I don't know whether she visits my crafts blog too. Even if she does, I'm counting on her being too busy with new baby to grasp that this is for her! Anyway, I'm having a blast making this even though it designed in a flash, but is taking some time to make all the little pieces. For the most part, I'm using the Cricut Lite B is for Boy and Create a Critter cartridges throughout the entire mini album. The paper is from the DCWV All About Boys paper stack with a few sheets of paper from We R Memory Keepers "Write Out Collection." Here's the cover which is probably the most involved part of the book (I hope). Stay tuned for a new page or two a day.

Photobucket

Photobucket
(Naturally, I used Mod-Podge for gloss)

Materials:

- Cartridge(s): B is for Boy (toys cut at 1.65" using my Gypsy, Baby Boy cut at 1"), Alphalicious (name cut at 1.25" and welded with my Gypsy)

- Adhesives: Glue Arts Glue Glider Pro, Xyron, Zig 2-way glue pen, Mod-Podge, glue dots

- Embellishments: Jolee's Boutique Dimensional Stickers ("Toddler Boy")

- Punch(es): Crop-a-dile

Friday, July 16, 2010

What a Pear

Happy Friday! I'm still being inspired by my new My Pink Stamper set called "Fruit and Veggie Puns." As usual, I Mod-Podged the die cuts for a little shine and also distressed the edges with black ink. Fortunately, I learned from my Spanish class (which uses a ton of cheesy graphics for visual learning) that if a face has eyelashes, then it's a girl! If it doesn't, then it's a boy. The "Critter Faces" stamp set from Peachy Keen stamps follows this rule.

Photobucket


Materials:

- Paper: A2 white card base, pattern paper (Making Memories "english garden") cut 5.25 x 4", strip of blue card stock (cut 2 x 5.25 before punching)

- Punch(es): MS Doily Lace

- Cartridge(s): Cricut Lite Savory (pears cut at 3")

- Adhesives: Tombow mono adhesive, Zig 2-way glue pen, Mod-Podge, glue dots

- Stamps: My Pink Stamper "Fruit and Veggie Puns", Peach Keen Stamps "Critter Faces" using Colorbox Chalk ink

- Embellishments: Ribbon scrap, pearls


Photobucket

Thursday, July 15, 2010

Thanks a Melon

One of the things I love most about summer is a slice of cool refreshing watermelon. Over the weekend, I saw a bunch of great picnic cards on Pink Cricut's Picnic Blog Hop on Saturday, so that got me thinking about picnic foods. Then guess what arrived in yesterday's mail? My new set of My Pink Stamper stamps called "Fruit and Veggie Puns."

Photobucket

Materials:

- A2 white card base, pattern paper cut 5.25" x 4"

- Cartridge(s): Block Party (watermelon cut at 4")

- Adhesives: Glue Arts Glue Glider Pro, Zig 2-way glue pen, pop dots

- Stamps:: My Pink Stamper "Fruit and Veggie Puns"

- Ribbon from Michaels


Photobucket

Wednesday, July 14, 2010

Ice Cream Bear

This bear has got to be my favorite critter on the Create a Critter cartridge. The ice cream cone is from Carousel. While I'm getting the hang of working with an A2-sized card rather than the larger 5 x 7", sometimes I have difficulty saving room for the greeting. For the horizontal bear, I simply put the following message on the inside, "Sending warm fuzzies." Too cute, right? It's for my husband, so it'll do.

Photobucket

Photobucket

Materials:

- A2 white card base, pattern paper cut 5.25" x 4", another strip of patterned paper cut 4 x 1.75"

- Cartridge(s): Create a Critter (bear cut at 3"), Carousel (ice cream cone cut at .75")

- Adhesives: Glue Arts Glue Glider Pro, Zig 2-way glue pen, foam tape

- Stamps:: Hero Arts "Friends"

- Ribbon from Michaels


Another look:

Photobucket

Photobucket

Tuesday, July 13, 2010

The Greeting Farm: Fleur Anya

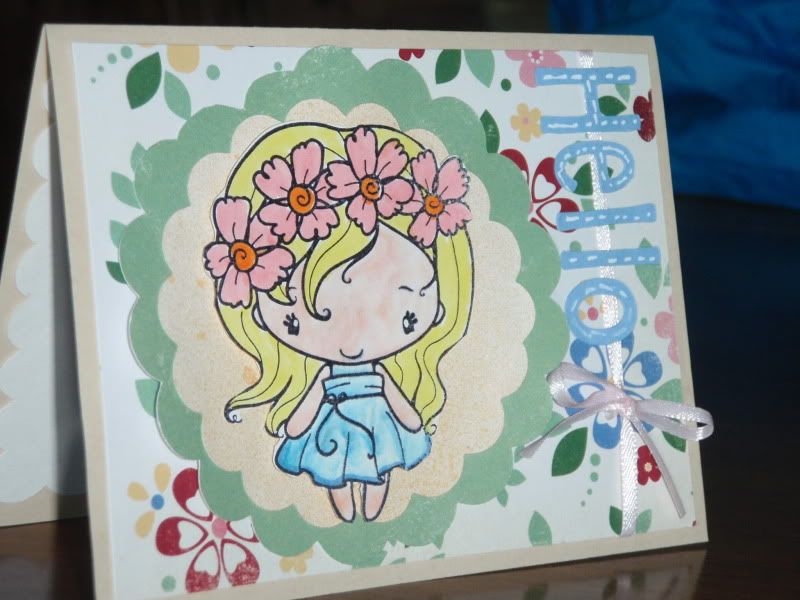
Good morning! I did lots of stamping over the weekend. Well, I actually worked with the same image to make multiple cards, but I learned a lot in the process. First, I learned from various Youtube videos that clear embossing an image will make it nearly smudge-proof! As a beginning stamper/colorer, I need all the help I can get. Also, the clear embossing makes the image catch the light and stand out more. You can see how the thank you card (not embossed) looks more muted than the hello card (is embossed). Another difference is that the hello card is colored mostly with Copic markers, while the thankyou card is all Tombow Dual Brush watercolor pens. While I'm really getting the hang of blending the watercolor pens, I decided to take the plunge with the Copic markers even though they are more expensive and less forgiving than the watercolors because the coloring is richer. I ordered another 15 or so using a gift cert from my auntie, which should come this week. Now I need to build my collection of Greeting Farm stamps :)

Photobucket

Photobucket


Materials:

- A2 beige card base, patterned paper (Making Memories "English Garden") cut 5.25" x 4"

- Cartridge(s): Gypsy Wandering (scallops cut at 3.5 and 4", Cricut Lite Cherry Limeage (greeting cut at 1"), Pooh font (same)

- Adhesives: Glue Arts Glue Glider Pro, foam tape, Xyron, all-purpose glue

- ribbon (1/8 and 3/16")


One last look at the embossing:

Photobucket
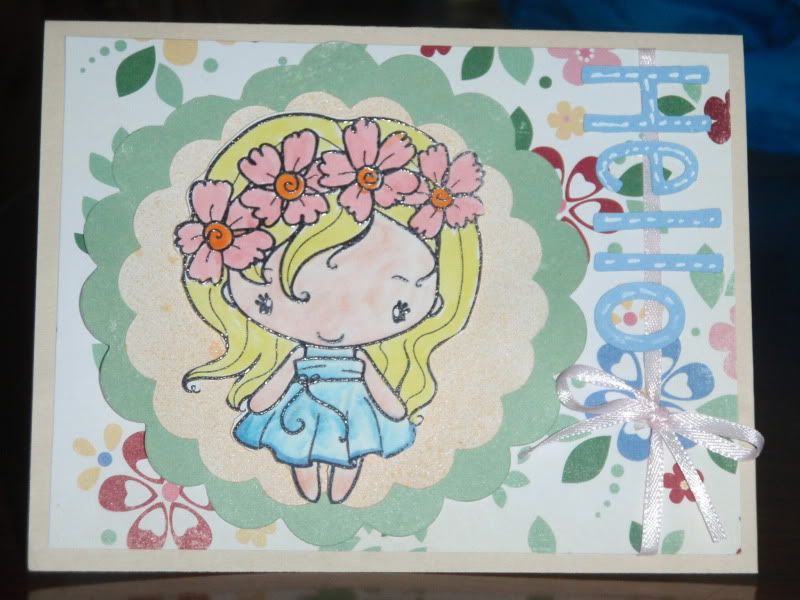
I glimmer-misted the first scallop layer.